

Ricoh Copier Setup
From here you can download the latest clients available and get step by step instructions for setting up the Copiers on your computer. Click on the following links for help with:
- Copier Driver Downloads
- Copier Network IP Addresses
- Install a Copier on a Mac
- Install a Copier on Windows
Important information about Printing to the Copiers
In the past we accepted print jobs directly to the copier. It was easy to use and setup. The downside is that it led to A LOT of waste and a lack of privacy. People would print 100's of pages to the copier and then leave them there without picking them up. Because of issues like these we have moved to a 'Send & Retrieve' model of printing. Now when a print job is submitted to the copiers the print job is held and waits to be retrieved via a pass-code. It is more complicated to use and less convenient, but it is much less wasteful and less expensive.
Copier Driver Download
NOTE:
- Krypton is now a different model copier than the rest. If you are connecting to Krypton, please be sure to download the appropriate driver.
- If your system's driver is not included in the list below, you may run an out-of-date Operating System. Contact the Helpdesk if you need assistance with an upgrade.
| Krypton Copier Drivers | All Other Copier Drivers | ||
|---|---|---|---|
| Download Driver for macOS 14 (Sonoma) | Download Driver for macOS 14 (Sonoma) | ||
| Download Driver for macOS 13 (Ventura) | Download Driver for macOS 13 (Ventura) | ||
| Download Driver for macOS 12 (Monterey) | Download Driver for macOS 12 (Monterey) | ||
| Download Driver for Microsoft Windows 11 (64-bit) | Download Driver for Microsoft Windows 11 (64-bit) | ||
| Download Driver for Microsoft Windows 10 (64-bit) | Download Driver for Microsoft Windows 10 (64-bit) | ||
| Download Driver for Microsoft Windows 10 (32-bit) | Download Driver for Microsoft Windows 10 (32-bit) | ||
Copier Network Addresses & Fax Phone Numbers
| Name | Location | Hostname | Fax Number | Notes |
|---|---|---|---|---|
| Room 5245a | CHGR tearoom near main elevator lobby | 172.17.204.11 | 617-643-3202 | |
| Room 5809a | Near CHGR administration offices | 172.17.204.12 | 617-726-5735 | |
| Neon | Near 6th floor PNGU admin area | neon.mgh.harvard.edu | 617-726-0830 | PNGU ONLY- code required |
| Helium | Near ATGU Administrative offices | helium.mgh.harvard.edu | 617-643-3293 | |
| Argon | Mol. Biol. main admin area - behind reception | argon.mgh.harvard.edu | 617-726-6893 | |
| Krypton | Faculty admin area - near Pauline and Diane | krypton.mgh.harvard.edu | 617-643-3050 |
Install a Copier on a Mac
Step 1
- Download & open the appropriate driver for your Operating System from the list above.
- Install the driver following the system prompts.
Step 2
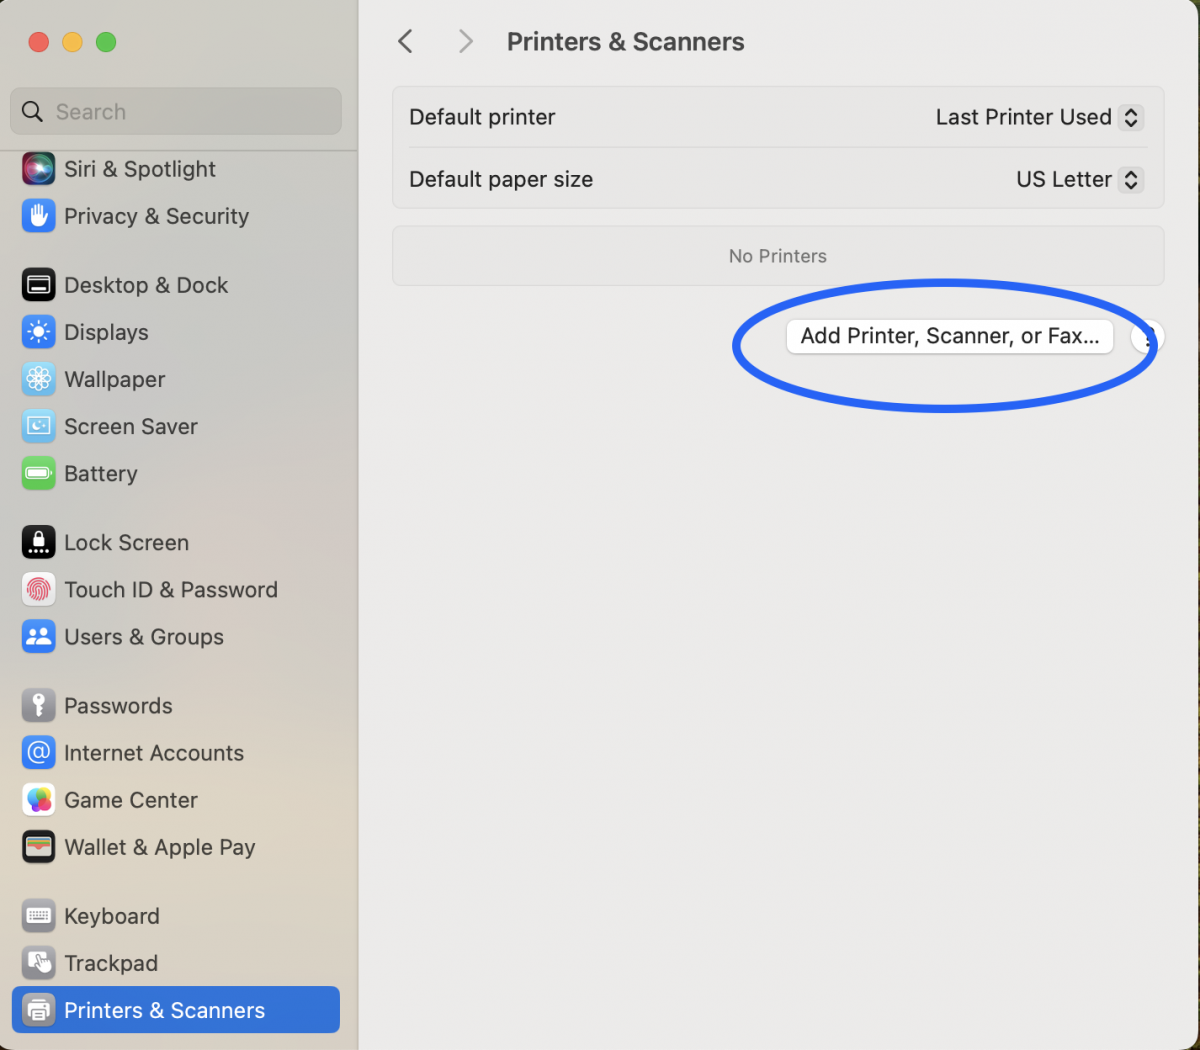
- Open the System Settings (available under the Apple Menu) and select 'Printers & Scanners'.
Step 3
- Click the 'Add Printer, Scanner, or Fax...' option to add a new printer/copier
- Select the 'IP' tab and enter the network address or Hostname (listed above) of the copier you want to print to.
- Give the Copier whatever name you'd like.
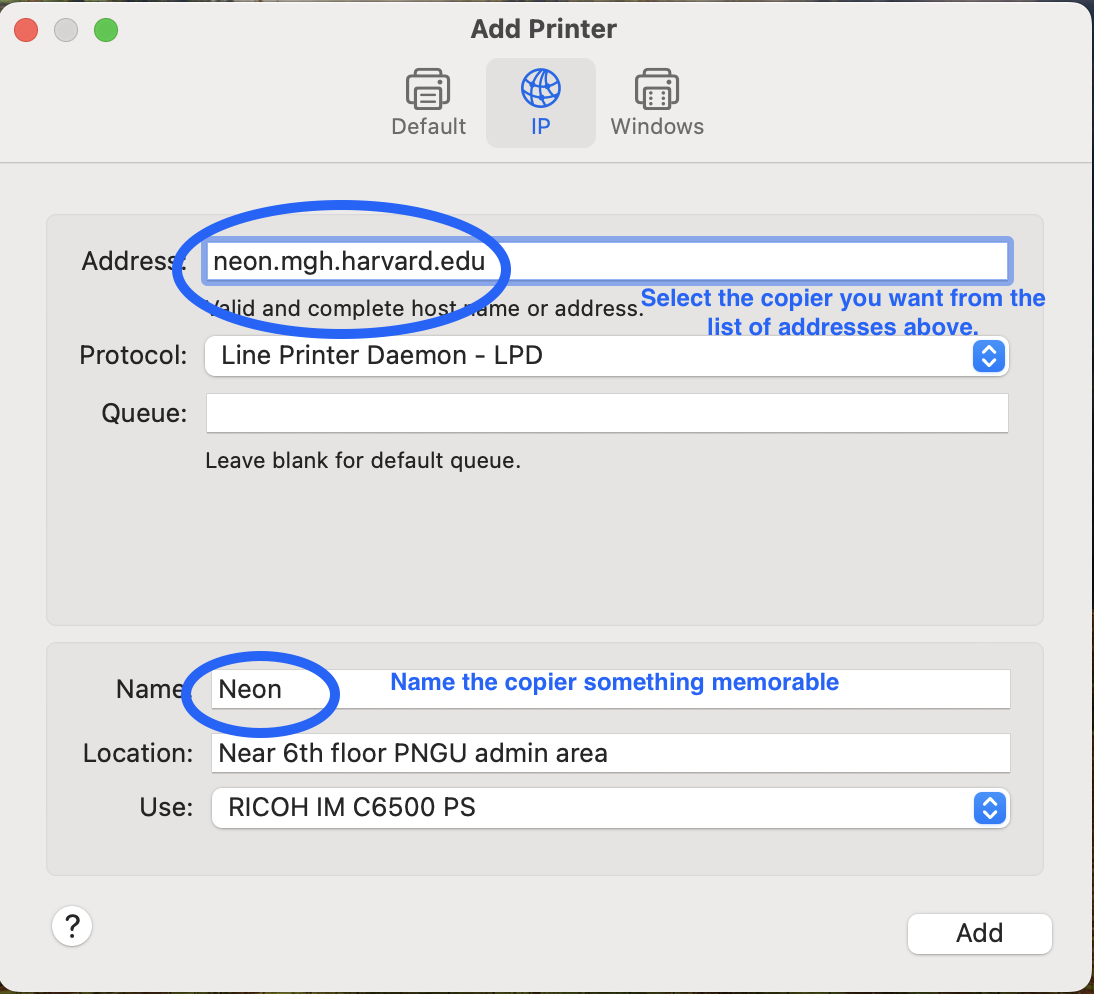
- Click 'Add'
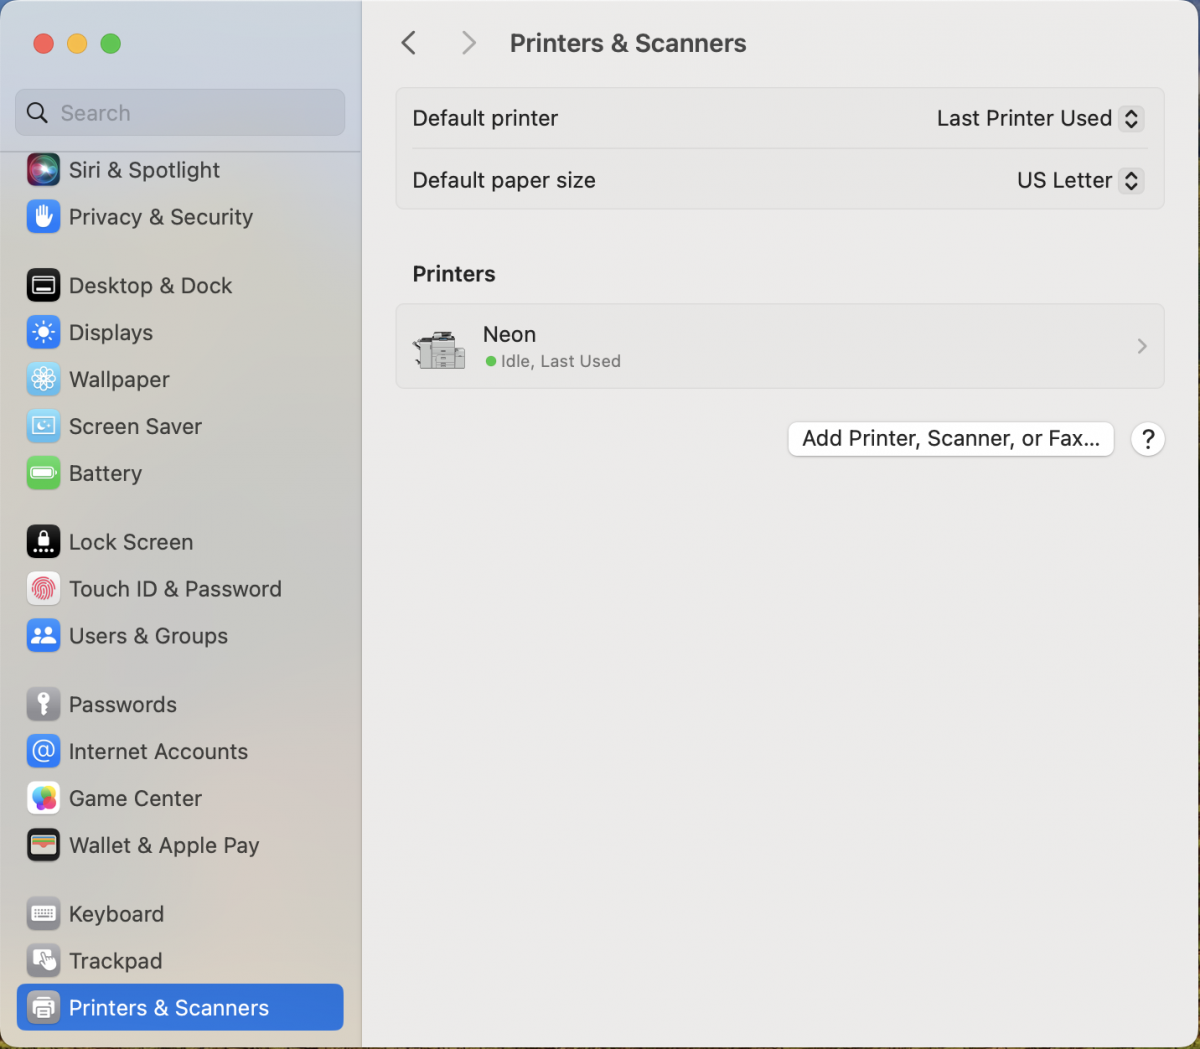
- You will now be returned to the Printers & Scanners window.
Interlude
- The copier is now installed on your computer, but it isn't setup to print properly. To finish the setup you need to print something and input a username and password so that you may retrieve your print job from the copier. In this example we will be using a MSWord document.
Step 4
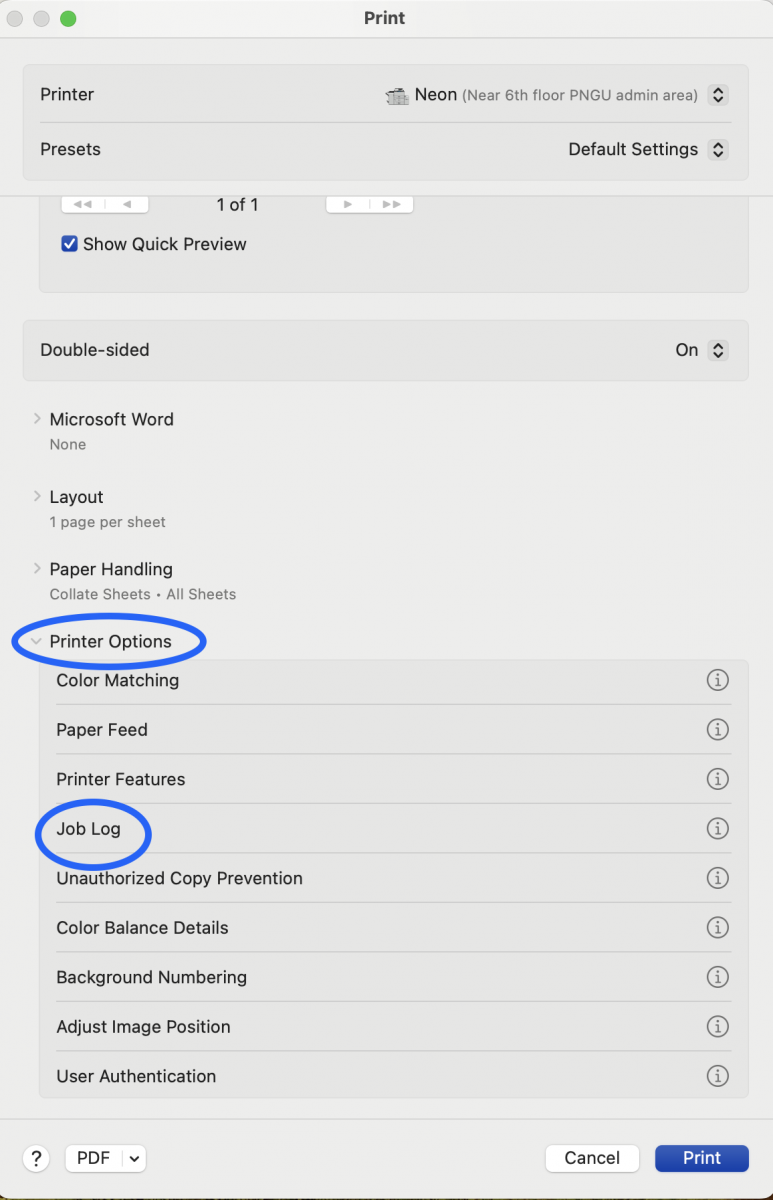
- Open a new document and select print from the menu
- In the print dialog box, scroll down and open the 'Printer Options' dropdown menu select 'Job Log'
Step 5
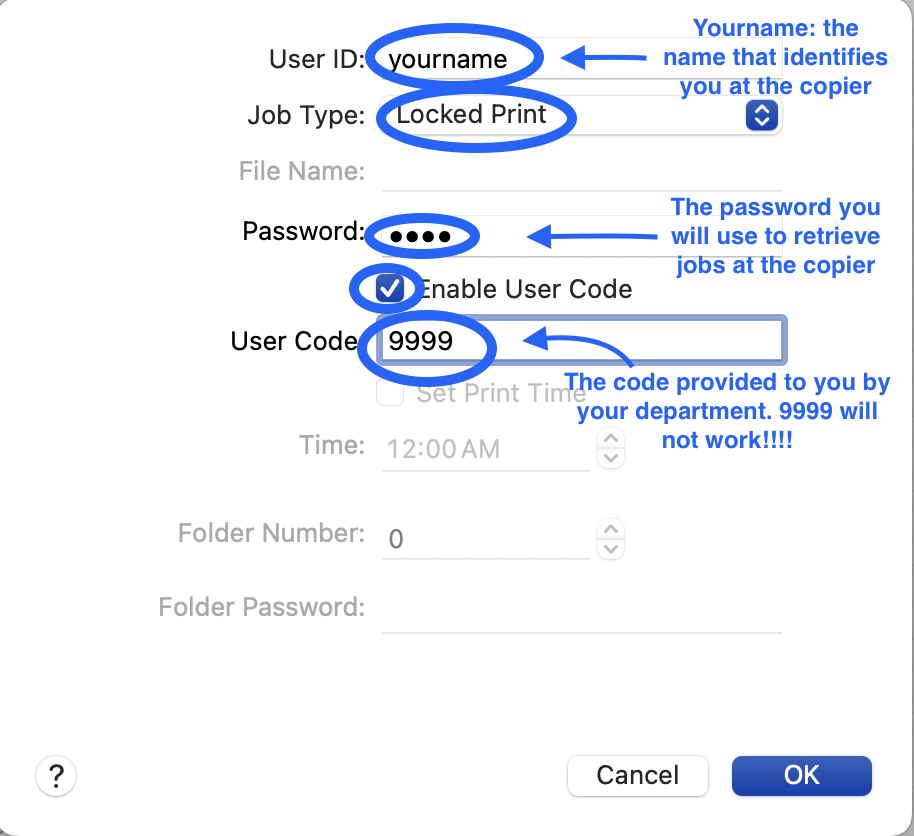
- Fill in the 'Job Log' information using the picture below as a guide. Substitute 'yourname' with your actual name. Choose a password that you can remember once you get to the copier and fill in the user code with the number provided to you by your department. If you are a member of Molecular Biology and do not know your copier code please email help@molbio.mgh.harvard.edu to request it.
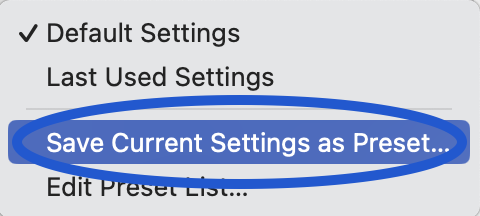
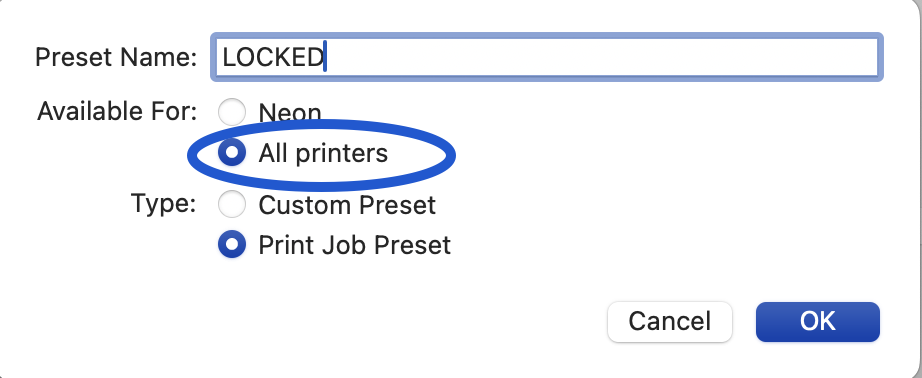
- When you're done select the 'Save Current Setting As Preset...' option from the 'Presets' Menu. It may also simply say 'Save As ...' depending on which MacOS you're using. Regardless name the new preset 'LOCKED' and have it available to all printers. Click 'Save'.
Step 6
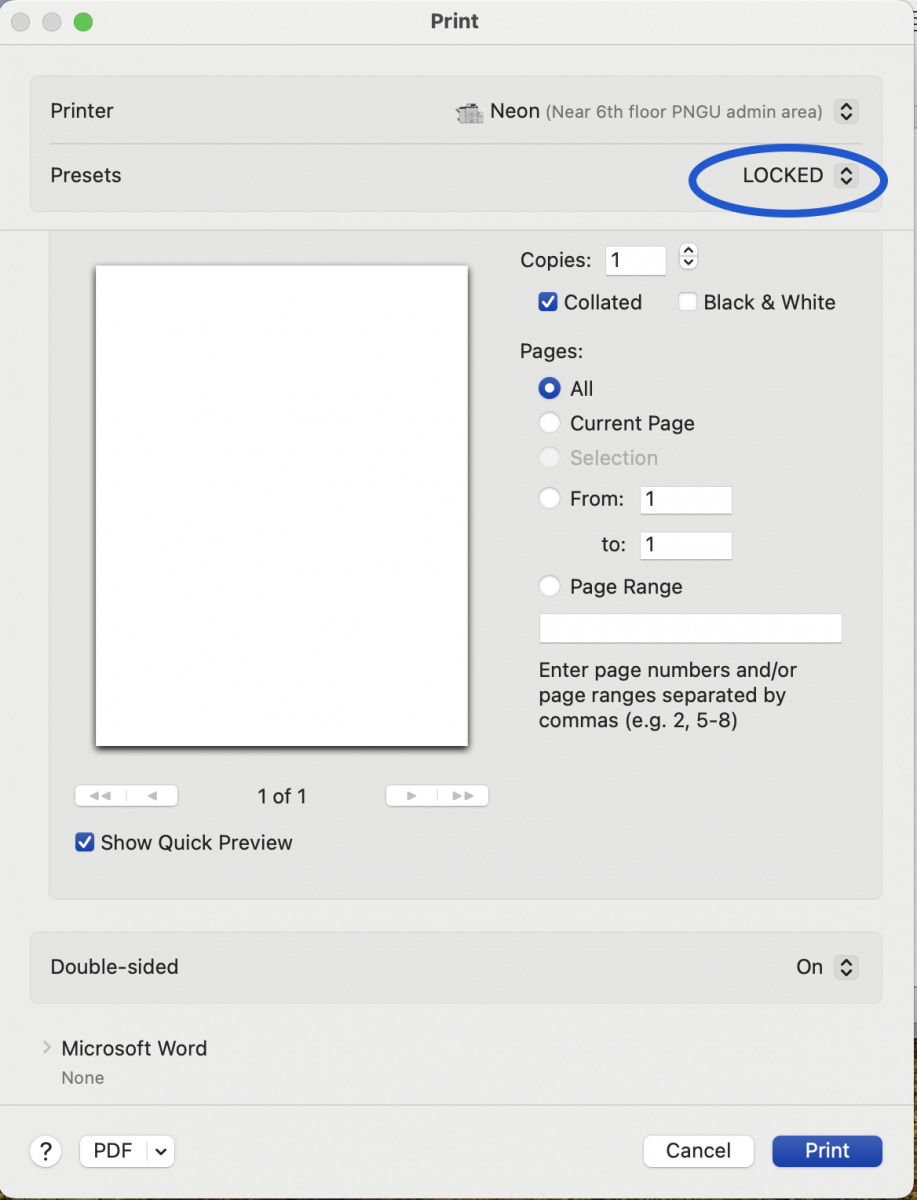
- That's it! Be sure to select the 'LOCKED' preset when printing to the copier.
WAIT WAIT WAIT! What do I do when I get to the copier?????
- Go to the copier you printed to.
- Press the Printer button on the copier.
- Press the 'Print Jobs' button on the LCD screen.
- Select the print job with YOURNAME on it.
- Input your password in the dialog box and press 'OK'.
Install a Copier on Windows 10
Step 1
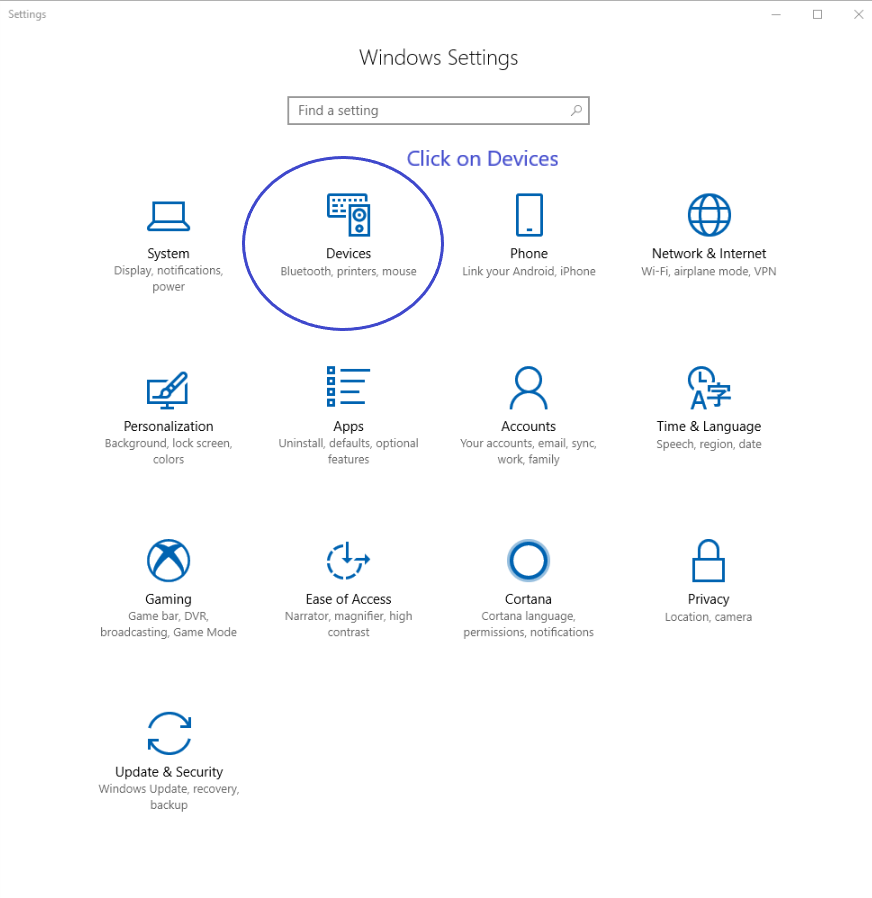
Click the 'Start' button and select 'settings' which is the little gear icon in the lower left of the menu.
Click 'Devices'
Step 2
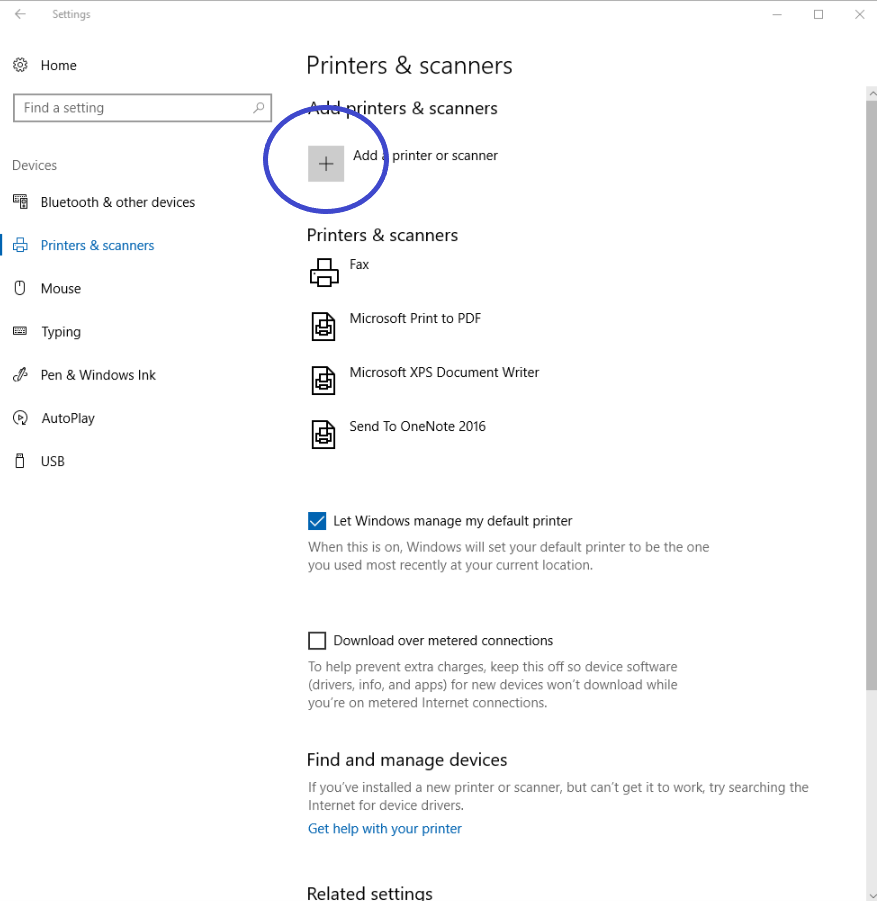
Click the 'Add printer or scanner' button.
Step 3
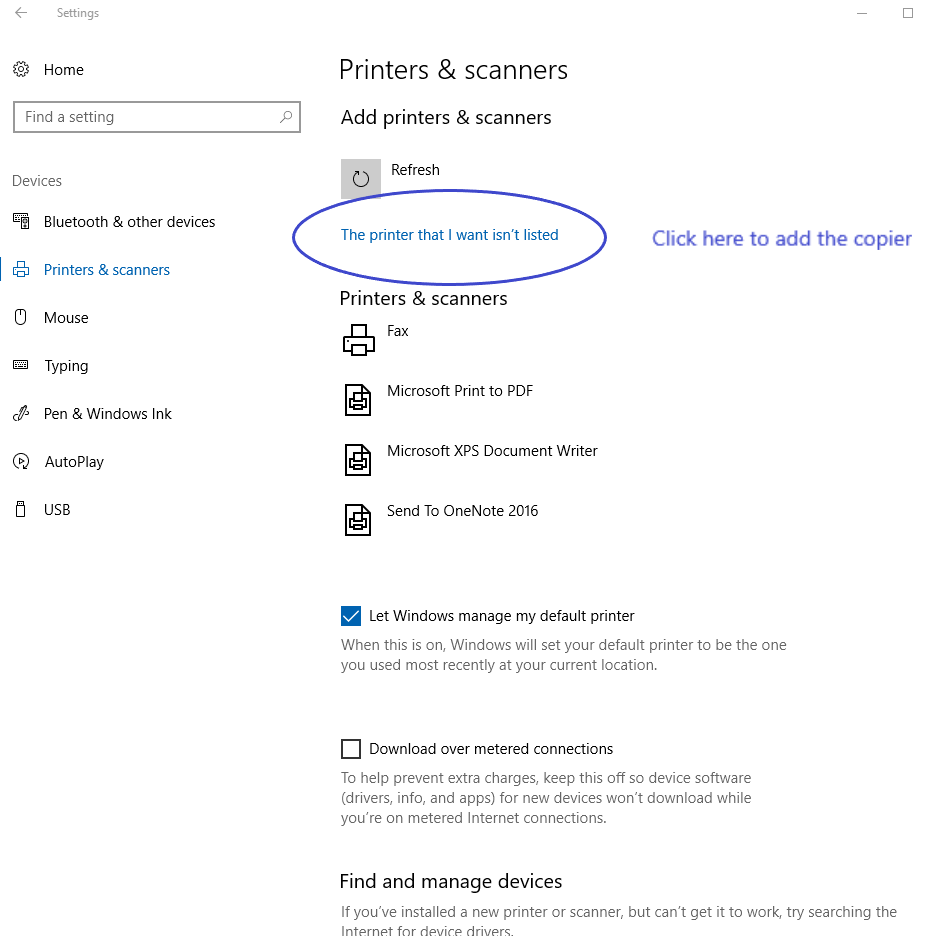
The printer won't be found. When available click the link 'The printer that I want isn't listed'.
Step 4
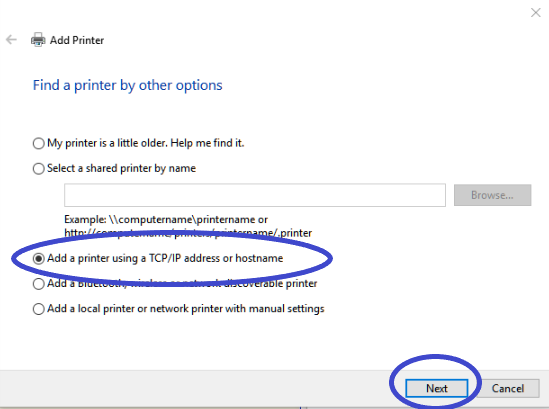
Select the 'Add a printer using a TCP/IP address or hostname' radio button and then click 'Next'
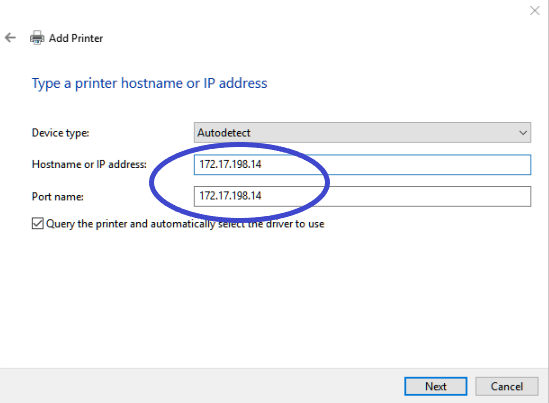
Step 5
Select the IP Address of the copier you want to connect to from the list above
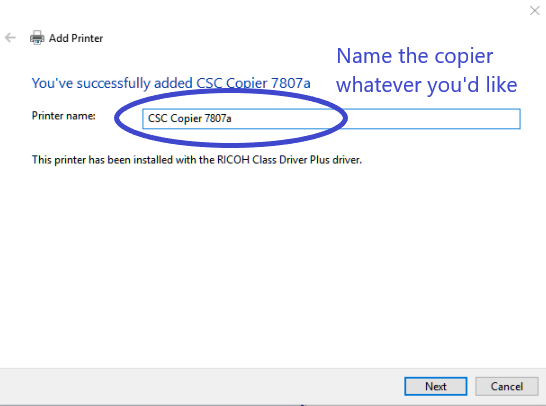

Step 6
Congratulations! You have succesfully added the copier to your computer. However you have to configure the copier before you can print.
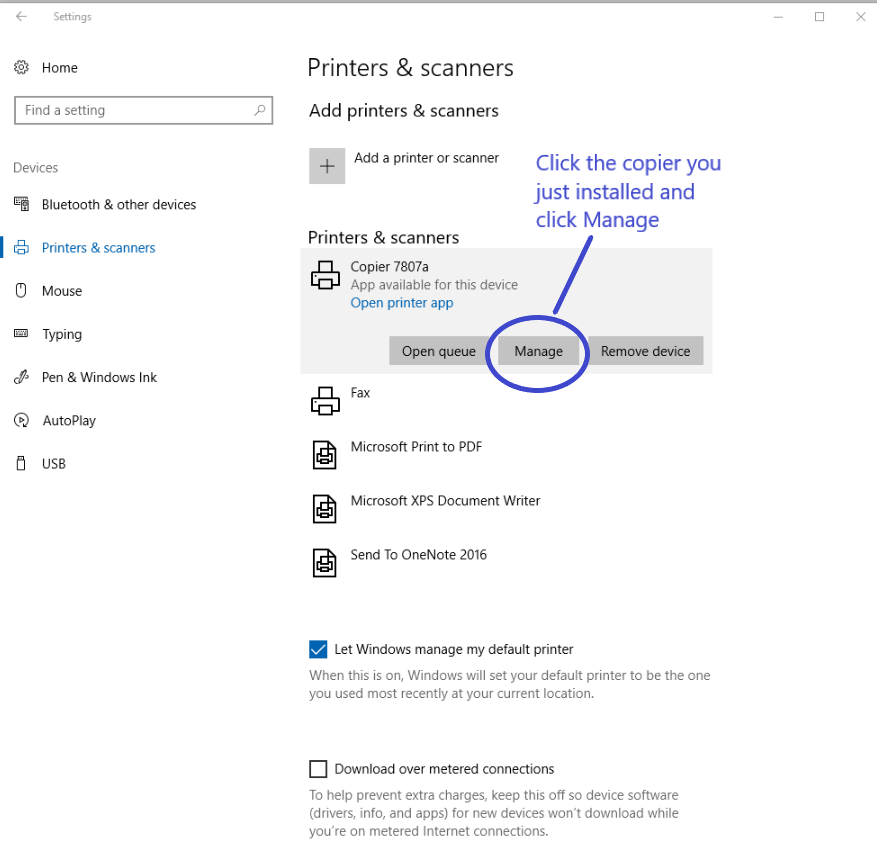
Step 7
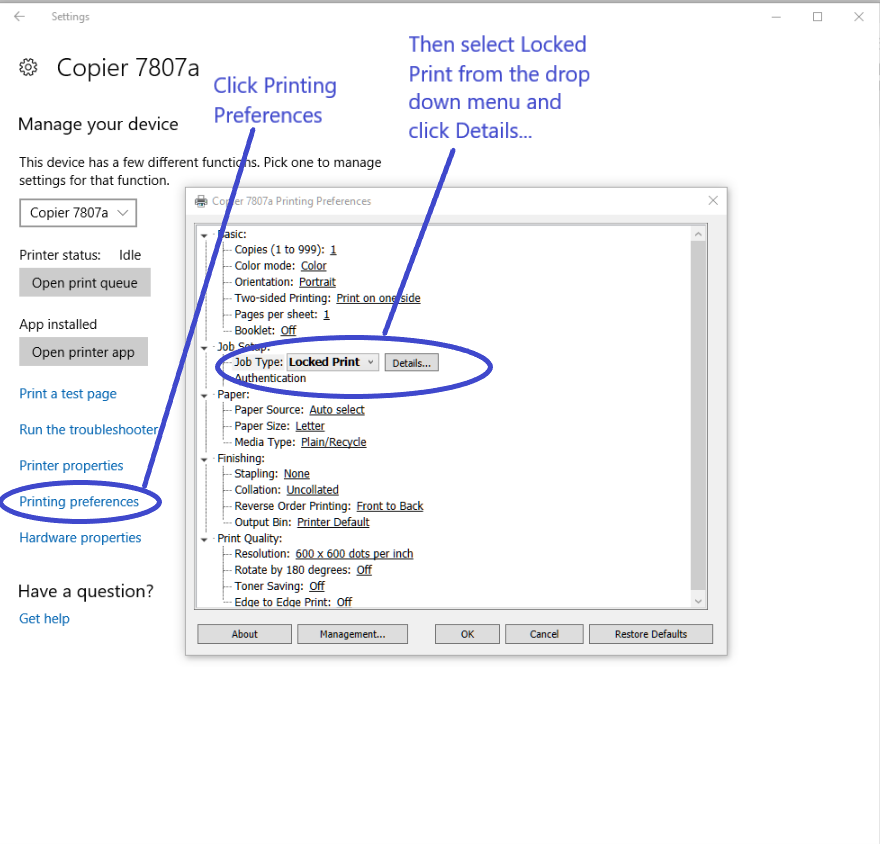
Step 8
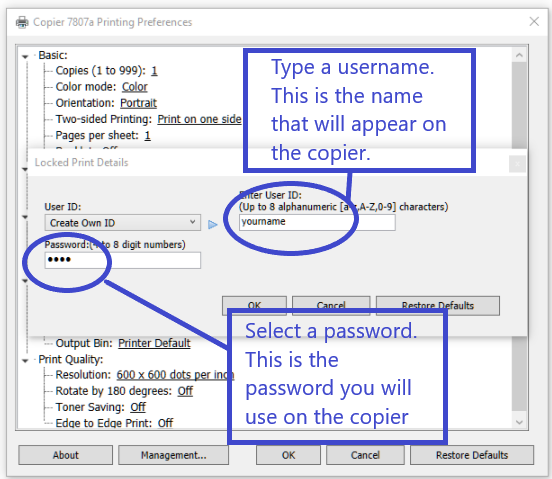
Fill out the username/password information you will use to retrieve prints jobs from the copier.
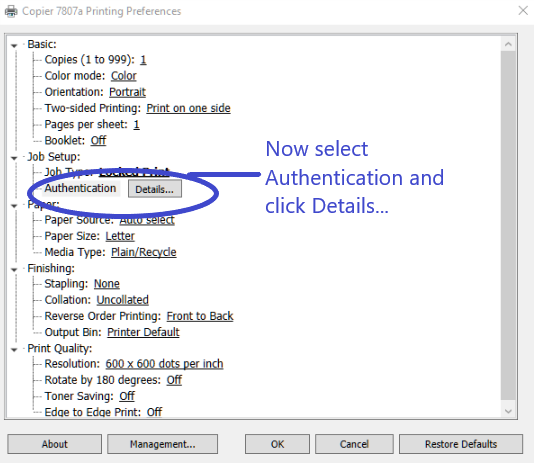
Step 9
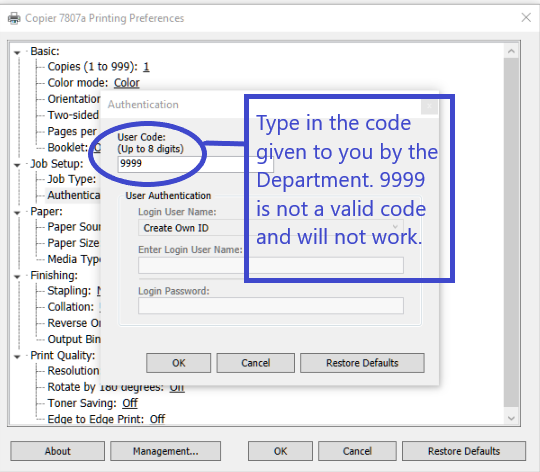
Type in the authentication code you got from the Department that authorizes you to send jobs to the copier.
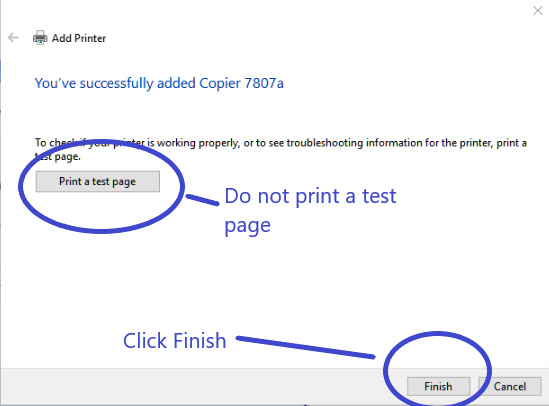
Step 10
That's it! The copier is now setup to print correctly on your computer.
WAIT WAIT WAIT! What do I do when I get to the copier?????
- Go to the copier you printed to.
- Press the Printer button on the copier.
- Press the 'Print Jobs' button on the LCD screen.
- Select the print job with YOURNAME on it.
- Input your password in the dialog box and press 'OK'.